
")
")
Software
The P-Soft software emulates the functioning of the Sampo.
Manual
P-Soft software manual
-------------------------------------------------------------------------------
Table of contents :
1. Software
1.1 Description
1.3 Sections of the software window
1.4 Principles
1.5 Managing the registers and the banks
To make a quick walkthrough of the software, go directly to chapter 2. P-Soft Walkthrough.
To read the requirements for the score writing, go to Score writing.
1. Software
1.1 Description :
This software is part of an extension for an acoustic instrument. It is distributed in the objective of letting users program an environment for the treatment of effects and write scores for acoustic instruments in real-time.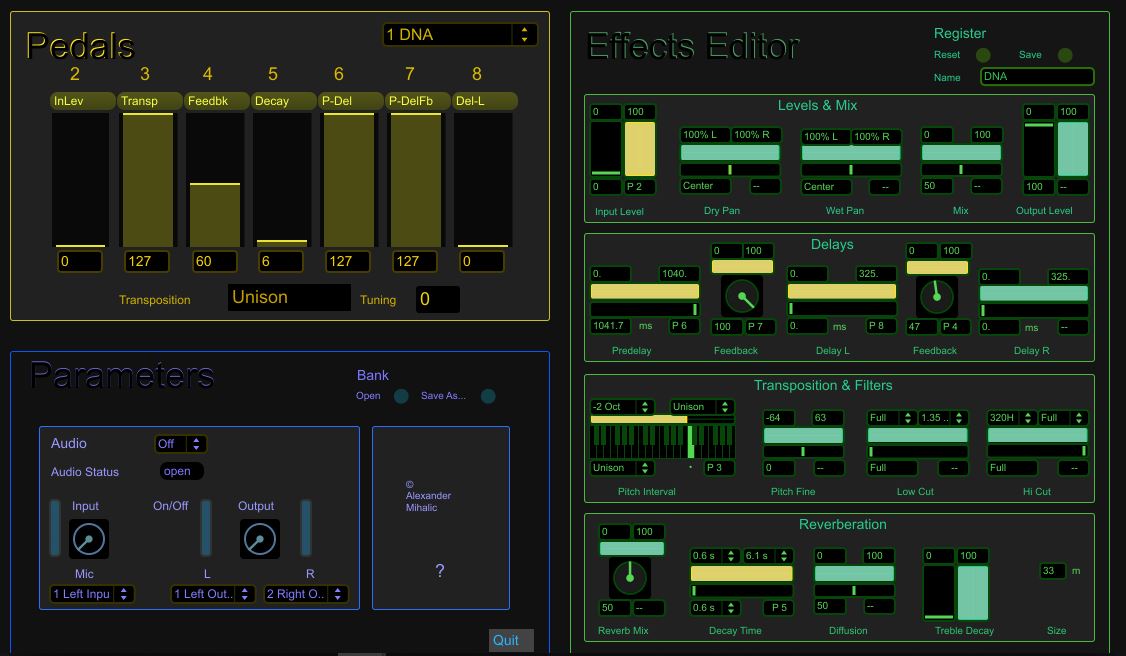
1.2 Opening the software :
P-Soft is supplied in the form of a MaxMSP file. To open P-Soft, you need to have a recent version of MaxMSP Runtime (version 6.1.3 and higher) installed on your computer.
You can download MaxMSP Runtimer for free here:
Download the Max Runtime Cycling 74
Once you have appropriately installed the MaxMSP software, start by opening up “Max Runtime”. From the File menu, open the file P-Soft.
To be able to work properly, you need to make sure that the input and output sound parameters of your computer and of MaxMSP are defined according to the sound card you are using.
The management of audio and MIDI are taken care of by the host software MaxMSP. For more details, you can read the MaxMSP user manuals on Cycling webpage.
1.3 Sections of the software window - ”Panels”:
The software opens up in a sole window divided in three parts:
1 – Pedals
2 – Effects Editor
3 – Parameters
1 - PEDALS
This panel allows the user to control and emulate the real pedals used on the device. This is also the panel for the musician with the main information: which parameters are assigned to which pedal, the name and number of the selected register, visual position of the pedals.
2 - EFFECTS EDITOR
This is the centre for editing the effects parameters assignments. Each parameter can be assigned to a pedal, and the range of this assignment can be modified. The assigned parameters appear as yellow and the unassigned as green.
Here you can save the Registers, rename them or initialize them.
3 - PARAMETERS
This panel contains the basic settings of the software: audio, MIDI and the possibility to save or open banks. It is also in this panel that you set the general input and output sound level for the treatments.
1.4 Principles :
With the software you can simulate the pedals played by the musician and program the Registers and Banks.
The physical pedals are represented by the sliders in the PEDALS panel.
There are 7 continuous control pedals . Like the physical pedals, the sliders remain in position even if the menu with the registers has been changed.
The pedals’ values vary from 0 to 127.
Each pedal is affected to one treatment parameter whose name is indicated above the slider.
The “Transposition” and “Tuning” sections show the real values of these parameters.
.
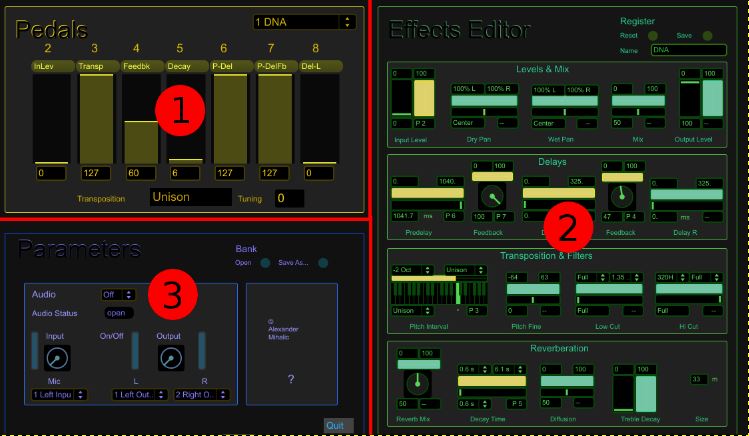
The editing of assignments and treatments is done in the EFFECTS EDITOR panel:

Each parameter can be defined as follows:
• directly the value of the parameter – using the slider or the number showing this value below
• the minimum and maximum limits (represented graphically by the coloured bar) – through the boxes above the slider (digit boxes or menus)
• the number of the pedal affecting the parameter between the predefined minimum and maximum levels. When a pedal is assigned to the parameter, the coloured bar turns yellow. Without any assignment the bar remains green.
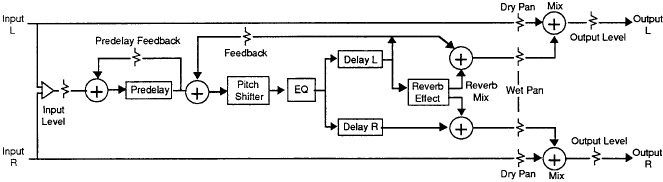
This is the treatment scheme:
All the parameters of audio input/output and MIDI assignment as well as the Bank management are done in the PARAMETERS panel:
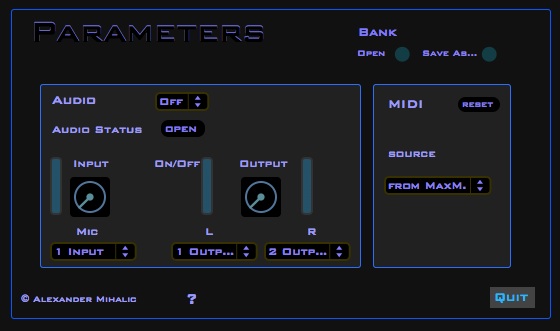
Here you can edit, control and change the audio input and output of your sound card.
To quit the application, click on the “Quit” button.
1.5 Managing the registers and the banks:
Registers :
The treatment states are stored in the Registers. Once the configuration of the parameters is finished, it is possible to save the register using the button “Register - Save”.
To generate a state with no assignments, click on the “Reset” button. The register will then be set to zero.

NB – the registers are not saved separately on the disc, but the “Register - Save” only saves them in the computer’s RAM. To save and open the registers you will use the banks.
Banks :
You have 8 registers to work with. The 8 registers make up a Bank.
You can save all the 8 registers in one bank on your hard drive using the button “Save As…” To open a Bank file, click on “Bank - Open”.

2. P-Soft Walkthrough:
To take the first steps with P-Soft:
-----------
1 – Open the Max Runtime application.

-----------
2 - In Max Runtime open the P-Soft file.

-----------
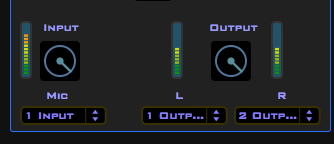
3 - First of all you need to configurate your sound card and choose one input and two outputs in the P-Soft software.
To do this, follow these steps:
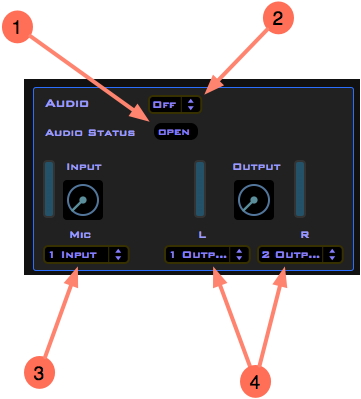
1 – Click on ‘Open” to access to the configuration panel of your sound card
2 – Return to P-Soft and turn on the audio
3 – Select the input of your microphone (mono input)
4 – Select the left and right outputs of your sound card
-----------
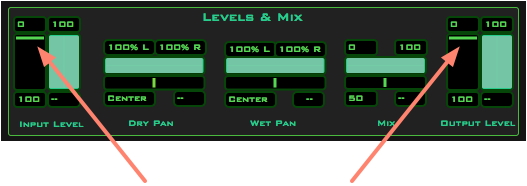
4 - Once you have set your sound card you can observe the input level in P-Soft.
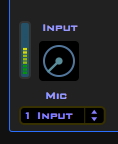
You can now open the input volume.

-----------
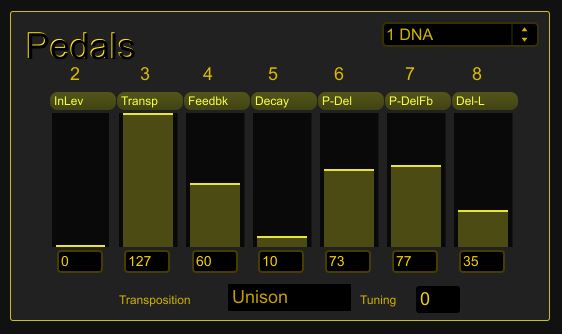
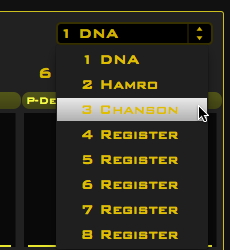
5 - Select the “DNA” register in the PEDALS panel and place the pedals sliders like this:
-----------
6 - Now open the output volume and make a sound. You will observe the Output levels.
-----------
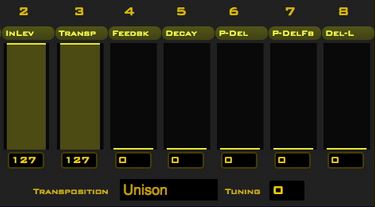
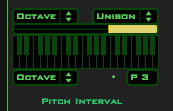
7 - Now modify the level of Pedal 3 (transposition) and listen to the result:
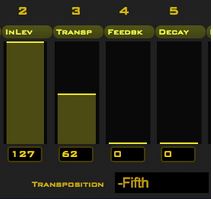
The transposition interval shows at the bottom of the PEDALS panel.
At the same time, as you move the Pedal 3, you can observe in the EFFECTS EDITOR panel the transposition represented as a note played on the virtual keyboard:

Make changes on Pedal 3 between 0 and 127 – the extreme positions. Despite these changes, you may observe in the EFFECTS EDITOR panel that the transposition only varies between the transposition to an octave lower and unison.
Observe the yellow bar just above the virtual keyboard – it graphically covers the distance between an octave lower and unison.
-----------
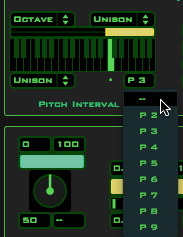
8 - Now click on the menu on top left of the “Pitch Interval” parameter:

You will have the possibility to define a new lower limit to the transposition on the scroll down menu. Select “Unison”:
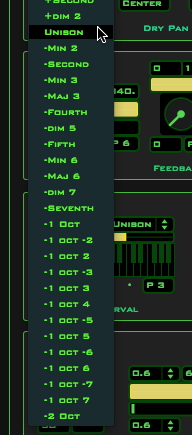
You now have the limits of the transposition set to the minimum “Unison” and the maximum “Unison”:

If you move the Pedal 3 in this configuration, there will be no change in transposition as the minimum and maximum levels are equal. The coloured bar indicates a sole note – the unison.
-----------
9 - Now change the maximum level for the transposition and choose one octave above:
Observe that the coloured bar covers the space between unison and the octave above.
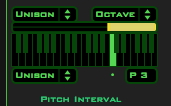
Move Pedal 3 and listen to the transposition which now goes up to the octave above.
-----------
10 - Now reverse the minimum and the maximum, setting the minimum to the octave above and the maximum to “Unison”:
If you move Pedal 3 now, you will transpose inversely – as you draw up the pedal slider, the transposition lowers and as you draw down the slider, transposition gets higher.
-----------
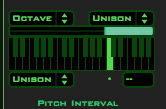
11 - Click the menu for selecting the pedal assigned to the parameter. It is located at the bottom right next to “Pitch Interval”. Select “—“. This means none of the pedals control the parameter.
Then click on the note “Do” shown as a dot below. You are doing a fixed “transposition” at unison.
You can now observe that the coloured bar has turned green, which means that no pedal is assigned to the parameter:
If you move the Pedal 3 now, there will be no change in transposition, as the pedal is no longer connected to this parameter.
However, you can still choose a fixed transposition which will remain assigned to the parameter without any change.
-----------
12 - Now click on the Registers menu in the PEDALS panel and reselect the first register called “DNA”:
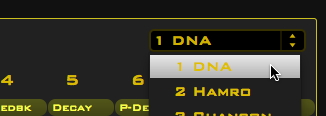
Pedal 3 is now again assigned to the “Pitch Interval” parameter with the original maximum and minimum levels.
-----------
13 - Select registers 1, 2 and 3 and observe the changes in the assignment of pedals and the configuration of parameters in the EFFECTS EDITOR panel:
-----------
14 - Once you have returned to the “DNA” register, click the button “Register - Reset”:
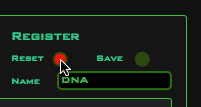
All parameters are set to zero – the neutral position, without pedal assignments and with the minimum and maximum levels at their widest.

Note that the “Input Level” and “Output Level” parameters have been initialized to 0. If you want to make the sound pass through the effects, you need to push up the levels like this:
-----------
15 - Change and modify the parameters to be played with the pedals, and save the state of each register.
To save all 8 registers on the hard drive, you should click the button “Bank - Save As…”

A dialogue box will open to let you save the file containing the complete configuration of all registers.
3. MIDI Assignments:
If you want, you can simulate the pedals with MIDI controllers. However, make sure not to move more than two potentiometers at the same time, as it is not possible to move more than two pedals at once with your feet!
The software is designed to be used through the mouse. If you want to add a MIDI controller to control the PEDALS sliders, you need to configure it according to the following scheme:
| Pedal | Ctl | Ch |
| 2 (continuous) | 7 | 1 |
| 3 (continuous) | 7 | 2 |
| 4 (continuous) | 7 | 3 |
| 5 (continuous) | 7 | 4 |
| 6 (continuous) | 7 | 5 |
| 7 (continuous) | 7 | 6 |
| 8 (continuous) | 7 | 7 |
NB:
If you simulate the pedals with “mixing desk” type interfaces, be careful not to change all pedals at once. Keep in mind that the musician can only play two pedals at the same time and that he cannot spend all his time searching where to put his feet.